Do you have a mirrorless or DSLR camera? Have you ever wondered what the letters and symbols on your camera’s mode dial mean? Is yours permanently set at AUTO? Are you keen to learn about your other options for creatively capturing images? Are you over me asking so many questions?
change that dial to M
Back to the camera’s mode dial. Let’s start with the grandaddy of them all - the big M. You know what that stands for, don’t you? M for Manual. Move that dial away from Auto and all the way to M - you can do it, I know you can!
If you ask me (and George Eastman), photography is all about the light!
If we learn how to control and play with the light (and we can only do this using the manual mode), we will know the key to photography.

“Light makes photography.
Embrace light. Admire it. Loveit.
But above all, know light.
Know it for all you are worth,
and you will know the
key to photography.”
George Eastman
the exposure triangle
Step one done! Before we start snapping away, we need to know a few basics - and the first and most important is the exposure triangle. Understanding what this is and how it works will help you go a long way in understanding how manual mode on your camera works. The exposure triangle is made up of the three big players in photography - ISO, shutter speed and aperture. These three settings work together to control how bright or dark your photo is (known as exposure), as well as the overall look of the image. Manual mode lets you manually control shutter speed, aperture, and ISO to produce a photo that is properly exposed. The trick is to balance all three of these to achieve a desired result.

Creating a harmonious exposure using the aperture, shutter speed and ISO is a juggling act. As soon as you make a decision about one element, you'll need to compromise with another in order to maintain the correct exposure. The trick to balancing the exposure triangle is to get all three elements working together so you get the results you want, and not what the camera tells you you can have.
We need to understand the basics of these three elements - shutter speed (how long the camera's shutter is open to expose light into the camera sensor), aperture (how much light the lens lets in) and ISO (the sensitivity level of the sensor). Knowing how to adjust these settings when needed, helps us get the best out of our cameras to not only take great photographs but to develop our photography style.
Let’s start with ISO
Think of ISO as a curtain. It’s blocking the light. When the curtains are drawn (a low ISO number) there is less light that is let into a room. When the curtains are raised (a high ISO number) the more light you see. In very basic terms, ISO is simply a camera setting that will brighten or darken a photo. As you increase your ISO number, your photos will grow progressively brighter. In most of my shots, I select my ISO first and keep it there for the rest of my shoot. I try to use the lowest ISO number I can. If your lighting is consistent you don’t need to worry too much about changing the ISO. I mainly increase my ISO in poorly lit situations and at night.
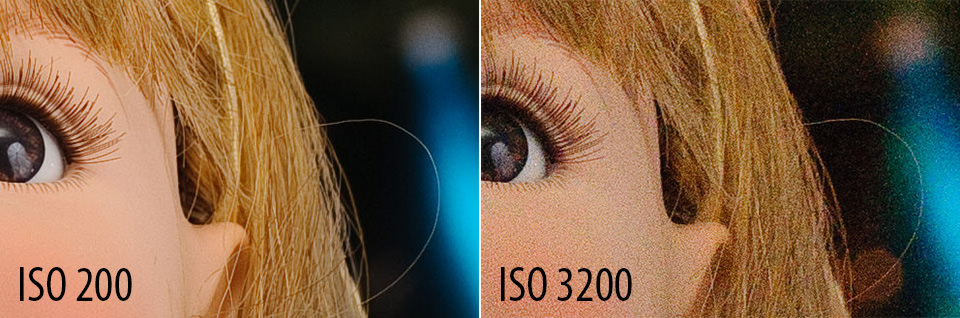
It is important to remember that increasing your ISO has consequences. A photo taken at too high an ISO will show a lot of grain, or noise, and may not be usable. So, brightening a photo using ISO is always a trade-off.
On most newer DSLR cameras, the lowest ISO setting is 100 and the value doubles as you increase i.e 100, 200, 400, 800 and so on. When you double your ISO, you are doubling the brightness of the photo. So, a photo at ISO 400 will be twice as bright as ISO 200, which will be twice as bright as as ISO 100.